In this tutorial we’ll show you how to migrate a blog off of Wordpress and onto a static site generator while preserving your blog’s content, links, and even comments.
There are many static site generators out there. The one we’ll be using is called Astro.
Note: this tutorial assumes familiarity with the command line as well as with JavaScript, HTML and CSS.
Why migrate off of Wordpress?
People have various reasons for wanting to switch their blog over to a static site generator. Here’s what motivated us to do this with our blog:
- It is much simpler to update the look and feel of the website.
- Wordpress can become unstable over time because of the way it’s designed. In our case, our blog began using excessive CPU, and it started generating errors spontaneously that began leaking onto the site itself.
- Wordpress runs dynamic PHP code on the server, and requires a PHP installation that must be constantly maintained so as to keep up with security updates. An insecure installation of PHP could lead to your website being compromised. Other bugs in Wordpress plugins or in other parts of the code can also lead to compromise.
- Wordpress will automatically update your website when a minor version is released. This is a double-edged sword that can protect you from exploits, but it could also force malware upon users if the update mechanism itself were hacked.
- Even with caching plugins, blogs powered by Wordpress are strictly slower to load than static websites.
- Should anything go wrong, it is much easier to move from one static site generator to another, than from a CMS (Content Management System) like Wordpress to another CMS.
- It is actually easier for multiple people to work on a blog post via pull requests to markdown files, than it is to use Wordpress’ UI for managing users.
- Although this isn’t a reason we chose to migrate (since we self-host), it’s worth mentioning that many people choose static sites because more platforms support the deployment of such websites.
Why Astro?
In this post, we’ll show you how you can migrate to Astro.
We chose Astro, a relatively new static site generator, for the following reasons:
- Astro’s design is both simple and powerful. It’s easy to implement a blog while also supporting web components written in various modern web frameworks like React, Vue, Svelte, and others.
- Astro’s flexibility means it can be used to add any future features we desire, and its simplicity and agnosticism means we are not married to it.
- Astro’s built-in components, written in
.astrofiles, are very clean and flexible. You don’t need to use any of the other frameworks it supports if you don’t want to. Astro components get the job done in most cases, and these components do not require a frontend runtime, so each page loads extremely fast on first load. - Astro has built-in support for markdown files, as well as
.mdxfiles. - Astro’s template syntax is basically standard JavaScript, so frontend developers are already familiar with it.
- For any JavaScript that needs to be run on the client, Astro supports “partial hydration”. Read more about how Astro compares to other static site generators here.
How does this relate to decentralization?
Both Wordpress and static site generators help decentralize the Internet by encouraging users to host their own blogs instead of using centralized services.
The problems we mentioned above make hosting a Wordpress blog more difficult than using a static site generator. When something is difficult to use, fewer people will attempt to do it themselves and will instead rely on centralized services to do it for them.
The steps
These steps were made using version 4.9.21 of Wordpress. Slight changes may be necessary for newer versions. Please feel free to comment if you notice any differences!
- Mirror your website locally
- Export your site’s posts and comments
- Use ‘Jekyll Exporter’ to export blog posts as markdown
- Clone
wordpress-to-astroproject - Deploy and (optionally) enable comments
Step 1: Mirror your website locally
Before we do anything, we need to create a local mirror of our blog.
We need to do this for two reasons:
- In case anything goes wrong with our migration, we can use the mirror as a temporary backup of our website.
- The mirror will contain the HTML and CSS that we need to convert our Astro template blog into an identical copy of our Wordpress blog.
There are two types of Wordpress blogs: those that are located at the root of a domain (e.g. https://blog.example.com), and those that are located in a subdirectory of the domain (e.g. https://example.com/blog). Depending on which you have, you’ll need to pass in slightly different arguments to wget.
Type 1: blog hosted at domain root
If our website is hosted at https://blog.example.com, then we can mirror it using wget like so:
$ wget -m -k -p -E https://blog.example.com
This will create a folder called blog.example.com with a copy of your blog and all attachments such as images, css files, etc. You’ll be able to browse your blog locally now simply by opening the .html files.
We give the followings options to wget:
-m   create a local mirror of the website
-k   converts links to ensure they are viewable locally
-p   download all files necessary to display the page
-E   convert extensions like .php in URLs to .html so that they're viewable locally
Type 2: blog hosted in a subdirectory
Let’s say we use the same command options as the above for our blog at https://example.com/blog:
$ wget -m -k -p -E https://example.com/blog
It’s possible that wget will mirror content outside of /blog, for example, it could end up mirroring example.com/forums and other pages as well.
To tell wget to traverse /blog only, use -np (no parent):
$ wget -m -k -p -E -np https://example.com/blog
This will still download some files referenced outside of that directory (for example images that were included in your blog posts but stored under https://example.com/images). You might want to go through what’s downloaded manually to make sure you have everything you want before proceeding.
Alternatively, you can tell wget to traverse everything except for specific directories by using the -X option. See the wget man page for details (man wget).
Step 2: Export your site’s posts and comments
In the Wordpress admin dashboard, choose Tools > Export and select All content. Then click Download Export File:
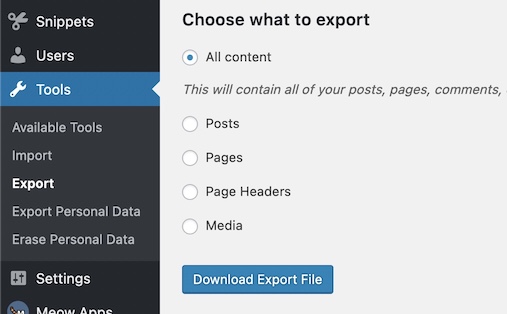
The downloaded .xml file is needed if you’d like to import your Wordpress comments, and may also come in handy in other scenarios.
Note the .xml backup doesn’t contain any assets like images - only the text content of your posts and comments. Images are included as links. That’s OK though, we should have all of our images at this point in the mirrored copy of the website we created in the previous step.
Step 3: Use ‘Jekyll Exporter’ to export blog posts as markdown
Blog posts in most static site generators are typically written in the very convenient Markdown format.
It would be best if we had a copy of our posts in this format, along with all of the post metadata (like categories, tags, author info, etc.) in markdown files that we can then re-render into fully-fledged HTML posts. This way we can write all our future posts in Markdown as well, and Astro will update all of the relevant pages for us.
The easiest way to do this is to install the Jekyll Exporter and use it to download a .zip file containing the exported, Jekyll-ified verison of our website. Jekyll is another static site generator, and luckily the format of the markdown posts it generates are compatible with Astro.
After unzipping the downloaded .zip file, find your posts in the _posts folder, we’ll copy these over into our Astro website later.
Other tools that we could use to accomplish this task include:
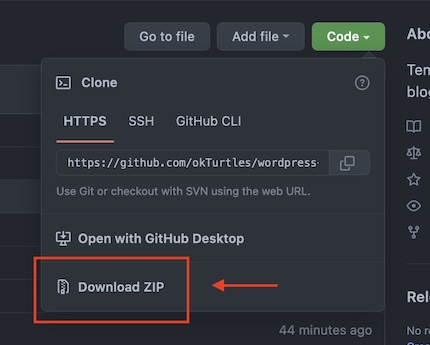
Step 4: Clone wordpress-to-astro project
The fourth and final step is to fork or clone the companion wordpress-to-astro project that we’ve created. You can even download a copy of the project as a .zip file:
This is the project you will be modifying to look like your existing blog. You will need to:
- Copy the markdown posts from Step 3 into the
src/posts/directory - Copy the
wp-contentfolder from Step 1 into thepublic/directory - Follow the steps in the
README.mdfile to get the project rendering locally (you will need Node.js installed) - And then review and modify the template project files as needed so that it looks like your original Wordpress blog. The files from Step 1 will be handy for this.
This project currently relies on using Astro.glob instead of getCollection. See this issue for details and if you'd like to help.
Step 5: Deploy and (optionally) enable comments
If you’d like comments on your posts, we recommend setting up an Isso instance, which can import your comments from Step 2. However, setting this up is beyond the scope of this tutorial.
Once everything is rendering to your liking, you can deploy the resulting static files in dist/ however you’d like.
Conclusion
Convering a Wordpress blog to a static website is doable! We’d like to thank the Astro team for creating an amazing open-source tool for creating static websites. They’re okTurtles by us!
This work is made possible by supports like you. Please help us continue to make posts like this by making a tax-deductible donation today.
Donating = Loving!
Without our supporters, we can't do what we do.
Please take this moment to support our work.